ARKit + RGB Sampling

I’ve been working on an ARKit app to paint with “pixels” floating in space. When the ARSession invokes its delegate method for ARFrame capture, I want to capture the colors the camera sees at the detected feature points. I then create a simple 3D box at that point with the sampled color and can then pan around the pixel. This is pretty neat when you scan someone’s face and then have them leave.

Anyway, that whole “sample the color of the camera’s captured image at an arbitrary 2D coordinate” turned out to be a dramatically more difficult problem than I had anticipated. Obstacles include:

  • Image is in CVPixelBuffer format.
  • The pixel buffer is in YCbCr planar format (the camera’s raw format), not RGB.
  • Converting individual samples from YCbCr to RGB is non-trivial and involves doing matrix multiplication.
  • There are several different conversion matrices out for handling different color spaces, just in case you wanted to convert an image captured off a VHS tape, I guess?
  • Apple’s Accelerate framework can do this conversion on the entire image very quickly, but the setup is quite complex and consists of invoking a chain of complex C functions. Once properly configured, it is spectacularly fast, converting an entire camera image in roughly 1/2 of a millisecond.
  • The Accelerate framework has not received much love since Apple’s switch to the unified documentation style last year: hundreds of functions appear nowhere in the documentation. The only way to figure out that they exist and how to use them is to browse the Accelerate header files, which are robustly commented.
  • Swift’s type safety is a big pain in the butt when you’re dealing with unsafe data structures like image buffers.

Setting up ARKit to display the “pixels” took about 2 hours (my first ARKit experiment and my first exposure to SceneKit). Getting the colors samples to color the pixels took about 2 days. I don’t feel like this learning process is anything that is particularly valuable for your average ARKit developer to master, so I’ve tidied it up and released it as a gist.

Check it out: CapturedImageSampler.swift

Usage: when your app receives a new ARFrame via the ARSession’s delegate callback, instantiate a new CapturedImageSampler with it. You are then free to query it for the color of a particular coordinate. I’m using scalar coordinates so that the sampling is scale-independent. If you want to find the color under a user’s tap, for instance, simply convert the x and y coordinates to scalars by dividing them by the screen width and screen height, respectively. When you’re done sampling (which must occur before the next frame arrives), simply discard the CapturedImageSampler by letting it go out of scope. Do not retain the sampler, use it asynchronously or pass it between threads. It should not live longer than the ARFrame that created it.

A word of warning: this object is not at all thread-safe due to the private use of a shared static buffer. I chose this implementation for maximum performance, since a new buffer does not need to be allocated for every frame received from ARSession. However, if you get into a situation where 2 instances of CapturedImageSampler are simultaneously attempting to access the shared buffer you will have a very bad day. If you need to have a thread-safe version of this, I suggest you make the rawRGBBuffer property non-static and add a “release” method that frees up the buffer’s memory when you’re done with it. Failure to manage this process correctly will result in a catastrophic memory leak that will get your app terminated within a couple of seconds.

Quick note on CoreML performance…

I just got done doing some benchmarking using the Oxford102 model to identify types of flowers on an iPhone 7 Plus from work. The Oxford102 is a moderately large model, weighing in around 229MB. As soon as the lone view in the app is instantiated, I’m loading an instance of the model into memory, which seems to allocate about 50MB.

The very first time the model is queried after a cold app launch, there is a high degree of latency. Across several runs I saw an average of around 900ms for the synchronous call to model to return. However, on subsequent uses the performance increases dramatically, with an average response time of around 35ms. That’s good enough to provide near-real-time analysis of video, when you factor in the overhead of scaling the source image to the appropriate input size for the model (in this case, 227×227). Even if you were only updating the results every 3-4 frames, it would still feel nearly instantaneous to the user.

From a practical standpoint, it would probably be a good idea to exercise the model once in the background before using it in a user-noticeable way. This will prevent the slow “first run” from being noticed.

A note on the Swift 4 Package Manager Syntax

I ran into some issues setting up a new Swift 4 project from Swift Package Manager. Specifically, my main.swift file couldn’t import the dependencies I specified in my Package.swift file. It turns out, you have to import your dependencies in the root dependencies: section, then refer to them by module name in the targets() portion of the package.

[gist d63d61ffaf8d7a73b174cc1f1801c8eb]

Omitting the declaration in your target means the module won’t be available to your app and your import statements will generate compiler errors for nonexistent modules.

Protobuf Server

Quick Links:
iOS AppVapor ServerPerfect Server

One of the primary challenges in learning to work with Protocol Buffers is finding an API to communicate with. Adoption is currently not wide-spread and I had trouble finding public APIs willing to communicate via protobufs. So, I decided to create my own API using server-side Swift, thus fulfilling the requirements (tenuously) for calling myself a full-stack developer. I looked at two of the most popular Swift web server frameworks currently available Vapor and Perfect.

The Contenders

Both offer easy setup via assistant tools (Vapor Toolbox and Perfect Assistant, respectively). However, the default projects’ setups are philosophically quite different. Vapor’s default setup is a fully-fledge web server with example HTML files, CSS, communication over multiple protocols, etc. Perfect’s default setup is extremely spartan, relying on the developer to add features as needed. Going head-to-head on documentation, I’d give the slight edge to Vapor, but both clearly explain how to handle requests and responses. Vapor has the reputation for having a larger and more approachable support community if you have questions, but I didn’t engage with either community so I cannot verify this.

Adding Protobufs to either default project is as simple as adding a dependency for it to the Package.swift file and running swift build:

.Package(url: "https://github.com/apple/swift-protobuf.git", Version(0,9,29))

Note: At the time of writing, the Swift Protobuf team considers 0.9.29 to be their release candidate, and may soon move the project to a full 1.0 release.

Once that is done, running swift build in the terminal from the root directory of the project will download the Swift Protobuf library and integrate it with your project. At this point, you’re ready to include the model files created from the .proto definitions. If you are unfamiliar with how to compile .proto files into Swift, I recommend this article as a primer. Once the models are in your Sources/ directory, you can use them in your request handling code to serialize and deserialize binary messages.

Working with Protobufs

Making a simple API server actually involves gutting the default implementation of both the Vapor and Perfect default projects, which are both set up to serve HTML responses. If you want to send Protobuf data to the server from your client app, you will need to use a POST route, as GET cannot transmit binary data. If you are simply going to request data from the server then GET is appropriate. If you’re receiving data, simply access the body data of the POST request and feed it into the init(serializedData:) initializer of your Protobuf model object to get copy you can manipulate as you see fit.

To send a Protobuf response to the client app, just follow these general steps:

  1. Create a new instance of the Protobuf model object.
  2. Assign values to the properties.
  3. Call try object.serializedData() to get the Data representation of the object.
  4. Assign the data to the body of the response.
  5. Set the content-type header to application/octet-stream. (This is optional, but is a good practice.)
  6. Send the response with a 200 OK response code.

The iOS app linked above shows the basics of using Protobufs with URLSession to parse the object(s) being returned by the server.

Protobufs 💕 BLE

Bluetooth Low Energy + Protocol Buffers

a.k.a. BLEProtobufs

Proto-whats?

Protocol buffers (protobufs) are the hot new data transport scheme created and open-sourced by Google. At it’s core, it is a way to describe well-structured model objects that can be compiled into native code for a wide variety of programming languages. The primary implementation provided by Google supports Objective-C, but not Swift. However, thanks to extensible capabilities, Apple has been able to release a Swift plug-in that enables the protocol declarations to be compiled into Swift 3 code.

The companion to this is a framework (distributed along with the plug-in) that handles the transformation of the model objects to and from JSON or a compressed binary format. It is this later capability that we are interested for the purposes of communicating with Bluetooth Low Energy (BLE) devices.

The primary selling point of protobufs is their ability to describe the data contract between devices running different programming languages, such as an iOS app and a .Net API server. There are dozens of excellent blog posts scattered about the web on protobufs, so that is all I will say about them here.

Here is the protobuf declaration for the message I will be sending between devices via BLE:

[gist https://gist.github.com/JoshuaSullivan/3b5ee005775842eb49ef3197b5673a58 file=”Packet.proto”]

A Quick BLE Primer

There are two primary actors in a BLE network: peripherals and centrals. Peripherals are devices which exist to provide data; they advertise their presence for all nearby devices to see. When connected to, they deliver periodic data updates (usually on the order of 1-2 times per second or less). The second type of device is known as a “central”, it can connect to multiple peripherals in order to read data from and write data to them.

A peripheral’s data is arranged into semantically-related groups called “services”. Within each service exists one or more data points, known as characteristics. Centrals can subscribe to the peripheral’s characteristics and will be notified when the value changes. The BLE standard favors brevity and low power consumption, so the default data payload of a characteristic is only 20 bytes (not kilobytes).

Data from a characteristic is received as just that, a plain Data object containing the bytes of the value. Thus, it is often incumbent upon the iOS developer to parse this data into native types like Int, Float, String, etc. This process is complex and error-prone, as working with individual bytes is not a common use case for Swift.

Enter Protobufs

As I mentioned above, protocol buffers can encode themselves in a compressed binary format. This makes them ideal for data transport over BLE where space is at a premium. In the example project I link to below, I am transmitting a timestamp in the form of an NSTimeInterval (double) cast to a float and three Int32 values representing the spacial orientation of the host device. I converted the rotational units from floating-point radians to integer- based degrees because integers compress much better than floating-point numbers in protobufs. After I set the properties the model object, I request its Data representation, which I save as the value of the characteristic. The data payload ranges from 5 to 12 bytes, based largely on the magnitude of the orientation angles (larger magnitude angles compress less). This is well below the 20 byte goal size.

In action:
[gist https://gist.github.com/JoshuaSullivan/3b5ee005775842eb49ef3197b5673a58 file=”ProtobufEncoding.swift”]

On the central (receiving) end, the app is notified via a delegate callback whenever the subscribed characteristic’s value changes. I take the Data value from the characteristic argument and pass it to the initializer of the protobuf-backed model object. Voila! Instant model object with populated properties that I can do with what I please.

In action:
[gist https://gist.github.com/JoshuaSullivan/3b5ee005775842eb49ef3197b5673a58 file=”ProtobufDecoding.swift”]

I have a pair of example projects available. The sending app is designed to be run on an iOS device and the receiving app is a simple OS X command line app built using Swift Package Manager (because frameworks + Swift CLI apps = hell). I’ve written the core of both apps using only Foundation and CoreBluetooth, so the sending and receiving roles should be easy to swap between different platforms.

Peripheral (sender) app

Central (receiver) app

Beyond View Controllers

In a nutshell: Remove from ViewControllers all tasks which are not view-related.

Quick Links:
Architecture Diagram PDF
Example Project

Problems with ViewControllers in MVC

The View Controller is typically the highest level of organization in the iOS standard MVC app. This tends to make them accumulate a wide variety of functionality that causes them to grow in both size and complexity over the course of a project’s development. Here are the basic issues I have with the role of view controllers in the “standard” iOS MVC pattern:

  • Handle too many tasks:
    • View hierarchy management
    • API Interaction
    • Data persistence
    • Intra-Controller data flow
  • Need to have knowledge of other ViewControllers to pass state along.
  • Difficult to test business logic tied to the view structure.

Guiding Principles of Coordinated MVC

Tasks, not Screens

The architecture adds a level of organization above the View Controller called the Coordinator layer. The Coordinator objects break the user flow of your app into discrete tasks that can be performed in an arbitrary order. Example tasks for a simple shopping app might be: Login, Create Account, Browse Content, Checkout, and Help.

Each Coordinator manages the user flow through a single task. It is important to note that there is not a unique relationship between Coordinators and the screens they manage; multiple Coordinators can call upon the same screen as part of their flow. We want a Coordinator to completely define a task from beginning to completion, only changing to a different Coordinator when the task is complete or the user takes action to switch tasks in mid-flow.

Rationalle: When View Controllers must be aware of their role within a larger task, they tend to become specialized for that role and tightly coupled to it. Then, when the same view controller is needed elsewhere in the app, the developer is faced with the task of either putting branching logic all over the class to handle the different use cases or duplicating the class and making minor changes to it for each use case.

When combined with Model Isolation and Mindful State Mutation, having the control flow of the app determined at a higher level than the view controller solves this scenario, allowing the view controller to be repurposed more easily.

Model Isolation

View Controllers must define all of their data requirements in the form of a DataSource protocol. Every view controller will have a var dataSource: DataSource? property that will be its sole source of external information. Essentially, this is the same as a View Model in the MVVM pattern.

Rationale: When View Controllers start reaching out directly to the Model or service-layer objects (API clients, persistence stacks, etc.) they begin to couple the model tightly to their views, making testing increasingly difficult.

Mindful State Mutation

View Controllers shall define all of their external state mutations in the form of a Delegate protocol. Every view controller will have a var delegate: Delegate? property that will be the only object that the View Controller reaches out to in order to mutate external state. That is to say, the View Controller can take whatever actions are necessary to ensure proper view consistency, but when there is a need to change to a new screen or take some other action that takes place “outside” itself, it invokes a method on its delegate.

Rationale: In the traditional MVC architecture, View Controllers become tightly coupled to each other, either by instantiating their successor view controller and pushing it onto a Nav Controller, or by invoking a storyboard segue and then passing model and state information along in prepareForSegue(). This coupling makes it much more difficult to test that the user flow of your app is working as expected, particularly in situations with a lot of branching logic.

The Architecture in Depth
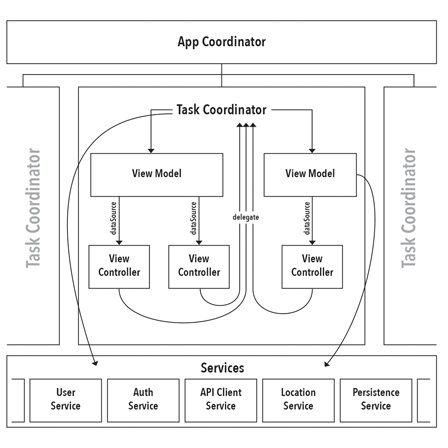

Download PDF Version

Task

A global enum that contains a case for every possible user flow within the app. Each task should have its own TaskCoordinator.

App Coordinator

The ultimate source of truth about what state the app should be in. It manages the transitions between the TaskCoordinator objects. It decides which Task should be started on app launch (useful when deciding whether to present a login screen, or take the user straight to content). The AppCoordinator decides what to do when a Task completes (in the form of a delegate callback from the currently active TaskCoordinator).

The AppCoordinator holds a reference to the root view controller of the app and uses it to parent the various TaskCoordinator view controllers. If not root view controller is specified, the AppCoordinator assumes it is being tested and does not attempt to perform view parenting.

The AppCoordinatorcreates and retains the service layer objects, using dependency injection to pass them to the TaskCoordinators which then inject them into the ViewModels.

Task Coordinator

Manages the user flow for a single Task through an arbitrary number of screens. It has no knowledge of any other TaskCoordinator and interacts with the AppCoordinator via a simple protocol that includes methods for completing its Task or notifying the AppCoordinator that a different Task should be switched to.

TaskCoordinators create and manage the ViewModel objects, assigning them as appropriate to the dataSource of the varous View Controllers that it manages.

Service Layer

Objects in the service layer encapsulate business logic that should be persisted and shared between objects. Some examples might be a UserAuthenticationService that tracks the global auth state for the current user or an APIClient that encapsulates the process of requesting data from a server.

Service layer objects should never be accessed directly by View Controllers! Only ViewModel and Coordinator objects are permitted to access services. If a View Controller needs information from a service, it should declare the requirement in its DataSource protocol and allow the ViewModel to fetch it.

Avoid giving in to the siren call of making your service layer objects as singletons. Doing so will make testing your Coordinator and ViewModel objects more difficult, because you will not be able to substitute mock services that return a well-defined result.

If you want to do data/API response mocking—say because the API your app relies on won’t be finished for another couple of weeks—these objects are where it should occur. You can build finished business logic into your ViewModel and Coordinator objects that doesn’t need to change at all once you stop mocking data and connect to a live API.

View Model

ViewModel objects are created and owned by TaskCoordinators. They should receive references to the service layer objects they require in their constructors (dependency injection). A single ViewModel may act as the DataSource for multiple View Controllers, if sharing state between those controllers is advantageous.

ViewModels should only send data down to the View Controller, and should not be the recipient of user actions. The TaskCoordinator that owns the ViewModel and is acting as the View Controller’s delegate will mutate the ViewModel with state changes resulting from user actions.

Putting it into Practice

I have created a simple “Weather App” example project that shows the architecture in action:

Example Project

Here’s how to follow flow:

  1. In the AppDelegate you can see the AppCoordinator being instantiated and handed the root view controller.
  2. In the AppCoordinator‘s init method, observe how it checks to see if the user has “logged in”.
    • If the user is not logged in, the user is directed to the Login task to complete logging in.
    • If the user is logged in, then they are taken directly to the Forecast task.
  3. When tasks have completed their objective, they call their delegate taskCooordinator(finished:) method. This triggers the AppCoordinator to determine what the next task is. In a fully-fledged app, there could be a considerable amount of state inspection as part of this process.

Quick Rules for Conformance

  1. No view controller should access information except from its dataSource (View Model).
  2. No view controller should attempt to mutate state outside of itself except through its delegate (usually a TaskCoordinator).
  3. No view controller should have knowledge of any other view controller save those which it directly parents (embed segue or custom containment).
  4. View Controllers should never access the Service layer directly; always mediate access through the delegate and dataSource.
  5. A view controller may be used by any number of TaskCoordinator objects, so long as they are able to fulfill its data and delegation needs.

Thanks

A big thank you to Soroush Khanlou and Chris Dzombak and their fantastic Fatal Error podcast for giving me inspiration to create this.

JTSSwiftTweener: Animating arbitrary numeric properties

UIView.animate() and CoreAnimation provide an excellent framework for animating changes to visual properties of views in iOS. However, what if you want to animate a non-visual numeric property? Some examples might be:

  • Animate the properties of a CIFilter.
  • Animate a number changing within a label.
  • Animate ANYTHING which isn’t a UIView or CALayer property.

There are some hacky solutions you can do such as making a custom CALayer subclass which uses a delegate callback to report the setting of some property. However, this is cumbersome to set up and maintain, so I created my own tweening library to fill in the gap.

How it works

Tweener is a fairly simple class. It has static methods for creating tweens as well as pausing and resuming animation. At it’s core is a CADisplayLink which provides “ticks” that drive the animation. The core measures the elapsed time since the last tick and advances each of its child animations by that amount. This approach allows animation to finish in constant time, even when the frame rate is fluctuating.

When the Tweener.tween(...) method is called, a new instance of Tweener is created and returned. Simultaneously, it is added to the internal array of managed instances so that it can receive ticks. If the CADisplayLink is paused, it is unpaused.

With each tick, the individual Tweener instances are told how much time has elapsed. They, in turn, calculate how far along through their duration they are and update their progress closures appropriately. If a Tweener instance determines that elapsed time has equaled or exceeded its duration, it calls its completion closure (if it has one) and flags itself as complete. At the end of every tick, the Tweener class scans its instances and removes the completed ones. If the number of active instances is reduced to zero, then the CADisplayLink is paused.

There is only one class file to include in your project, available here.

I also have a very simple example project for you to look at.

What’s next?

The two primary areas for improvement are:

  1. Performance – It seems to work pretty well, but I’ve not done extensive testing on the tick methods to ensure maximum efficiency.
  2. Additional Easing Functions – I only have two Easing families at the moment. There are dozens of variations documented online (see here), and adding a few more to the class would improve its flexibility.

String Obfuscation

Online services and APIs are an inseparable part of most apps. Often they require the use of a secret key to identify the subscribing client, usually is in the form of a long string of alphanumeric characters. Invariably, it would be a bad thing™ for a malicious user to get their hands on this key. Perfect security is impossible, but there are some simple steps you can take to make it more than trivially easy for snoopers to extract your API keys from your app.

strings: A Snooper’s Best Friend

There is a command line app called strings that is designed to scan binary files and print out anything it thinks is a string embedded within. Here’s the description from the man page:

Strings looks for ASCII strings in a binary file or standard input. Strings is useful for identifying random object files and many other things. A string is any sequence of 4 (the default) or more printing characters ending with a newline or a null.

Here’s a tiny bit of the output when I pointed it at the Photos application binary:

Burst favoriting action doesn't currently support the 'none' option
-[IPXChangeBurstFavoritesAction _revertFavoritingChanges]
***** Burst action: _revertFavoriting changes
Will undo/redo for Keep Selection option
Total: %ld. Trashed: %ld. Untrashed: %ld. Pick type set: %ld
Will undo/redo for Keep Everything option
Total: %ld. Fav: %ld. Unfav: %ld.
Warning: burst == nil
-[IPXChangeBurstFavoritesAction _setFavoritingOnVersion:stackPick:]
Invalid state: version exists in both favorite and unfavorite sets for action.
Burst Change - Favorite: %@
Burst Change - Unfavorite: %@
IPXChangeBurstFavoritesActionKey
IPXActionAlertThresholdMessageGeneric
IPXTestActionProgress
-[IPXActionProgressController endModal]
/Library/Caches/com.apple.xbs/Sources/PhotoApp/PhotoApp-370.42/app/spark/Source/Actions/IPXActionProgressController.m
-[IPXActionProgressController performActionSelector:]
Invalid selector
-[IPXActionProgressController checkModalSession]
Progress window still visible after action complete. Possibly hung? Action log:
appIcon

In the case of the Photos app, strings found 38675 string candidates. A lot of them were garbage, and there were literally thousands of Objective-C selectors, but there were also a lot of strings that were obviously never intended for user consumption. If it’s a string in your code, it will be found by strings and you can bet that someone snooping for API keys has pattern matching schemes that will make them trivial to find.

Obfuscation Basics

The easiest way to prevent Strings from finding your API keys is simply to not include them as strings. However, do not think that putting a sequence of ASCII bytes into an array is going to help you, if your array’s bytes match the ASCII codes for the characters, you’ve just made a cumbersome string and it will probably still be detected as such.

A good first step for obfuscation would be to mutate those bytes in some way so that they don’t all fall within the ASCII alphanumeric range. The two simplest, non-destructive ways of doing this would be:

  1. Invert the bytes by subtracting them from 255. So, a value of 10 becomes 245 and a value of 50 becomes 205, etc. Note: this is identical to using XOR with a nonce of 255.
  2. XOR each byte with a single-byte “nonce”, which is just random number between 1 – 255 (XOR with 0 produces no change). XOR is a reversible operation: if you XOR with a given byte twice, you end up with your original value. In practice, you’d want to pick a nonce byte that has at least 3 of the 8 bits as 1s to ensure sufficient mutation of your API key bytes.

Then you would simply store the converted bytes in your app instead of the string and convert it back to the string by reversing the operation at runtime to produce the original string.

To be quite honest, either of these approaches is probably good enough. But if you want to be more thorough…

Multi-byte XOR

If you are using the single-byte XOR approach from above, your API key would be safe from a simple strings search, but there are still only 254 ways you can possibly obfuscate the string and a really determined snooper might still be able to find it. Let’s make their job exponentially harder and use a multi-byte nonce!

The basis for this approach is a new Sequence type I created called RepeatingSequence. The general idea is that it initializes with any collection type and returns the elements in sequence, wrapping back to the first element once the last one has been emitted.

[gist https://gist.github.com/JoshuaSullivan/be8e02b9ad7a03377075791e36160610]

This lets us use a sequence of random bytes instead of just one. I created a Playground that you can use to generate a multi-byte nonce and use it to encode a string. Then, just include the byte array it prints out instead of the string in your app.

[gist https://gist.github.com/JoshuaSullivan/92472caefc789554863d429764ad0b59 file=”StringObfuscationPlayground.swift”]

Reconstituted Bytes

Of course, that byte array isn’t going to do you any good unless you can turn it back into a string. Here’s a struct with a static method that does just that:

[gist https://gist.github.com/JoshuaSullivan/92472caefc789554863d429764ad0b59 file=”ObfuscationDecoder.swift”]

This code is pretty simple to incorporate into your workflow and can give you a lot of peace-of-mind that your app’s API keys won’t be trivially easy to steal.

Protocols, Default Implementations and Class Inheritance

Say you have the following setup:

  • A protocol named Doable that defines the doSomething() method.
  • A default implementation for the doSomething() method in a protocol extension.
  • A base class that conforms to Doable, but does not implement the doSomething() method itself.
  • A sub-class inheriting from the base class which provides a custom implementation of the doSomething() method.
  • An array of mixed base and subclass instances that is type [Doable].

The results of invoking doSomething() on all elements of the array may surprise you. When the for loop / reduce / whatever invokes doSomething() on a member of the array which is a subclass, you will not get the subclass’ custom implementation. Instead, you will get the default implementation!

When the runtime goes looking for doSomething() on the current object (of type Doable) in the loop, it looks to the object which actually conforms to the Doable protocol, which is the base class. The runtime checks to see if the class implements the method, and when it sees that the base class does not, it falls back to the default implementation, rather than seeing if the subclass implements it. Apparently, the subclass is only checked in instances where it is overriding a method explicitly defined on its superclass.

So, the solution is actually quite simple:

  • Provide an implementation of doSomething() on the base class. It can just be a duplicate of the default implementation, if that’s the behavior you want for it.
  • Change the subclass’ doSomething() implementation to include an override declaration.

That’s it! The next time you run your loop, the sub-class will have it’s doSomething() method called. I made a playground for you to check this out (turn on documentation rendering):

[gist https://gist.github.com/JoshuaSullivan/0752d008e1aa08febdd18c25954183d7]

CIColorCube

The CIColorCube filter is quite an interesting beast. It is incredibly hard to set up properly, given the odd data requirement, but can recreate very complex color effects efficiently.

inputCubeData

The cube data is a NSData / Data object containing a sequence of floating-point color values where the red, green, blue, and alpha channels are represented not by the usual 8-bit UInt, but by 32-bit Floats. This is Core Image’s internal working color format, which allows much greater precision when mixing colors and prevents rounding errors. The size of the NSData must be precisely (size^3 * 4 * sizeof(CGFloat)) bytes where size is one of the following: 4, 16, 64, or 256. That is to say, the width * height * depth * 4 color channels * the size of a CGFloat.

The CIColorCube documentation describes the format the data should take:

In the color table, the R component varies fastest, followed by G, then B.

Using this rule, we can produce a reference image that looks like this:
colorcubeimage64

Certainly not your standard spectrum image, but it’s designed for Core Image’s consumption not our aesthetic enjoyment.

PNGs are the key

One major problem encountered working with cube data as NSData / Data is that it is quite large. Color cube data with a dimension of 64 requires (64 * 64 * 64 * 4 * 4) = 4,194,304 bytes or 4 megabytes. Each color cube you store in your app consumes 4MB of storage, which is pretty excessive! Luckily, there is a better way.

While storing the color cube data as CGFloats might be more precise, it is almost never necessary to have that level of precision when defining a color effect. We can use PNG images to encode the data for the color cube in a much more efficient format. For example, the reference image I included above (which is for a size 64 cube) occupies only 8kB on disk!

The other primary benefit of storing the data as a PNG is that we can use readily-available bitmap editing programs like Photoshop to modify them. This is crucial unless you want the Color Cube filter to produce output that looks identical to the input.

Here is a Gist that has Swift 2 and Swift 3 versions of a class that can generate these reference images: https://gist.github.com/JoshuaSullivan/5951e08ff0f3e155ef52220a181864e8

Alternatively, if you just want to download and use the images, you can get them here: Color Cube Reference Images

Create your effect

The next step is to create a color effect. You can use any kind of color transformation you like on the reference bitmap. It is important not to use any distortion, blurring or other kinds of filters that would change the layout of the pixels, unless you’re interested in some extremely glitchy looking results.

In Photoshop, I find it handy to work on an actual photograph, applying the filters as layer effects until I have something I’m happy with. Then I simply copy the layer effects onto the reference image and save the result. Here are some examples I made for my Core Image Explorer app:

This is a very high-contrast B&W filter, approximating having a deep-red filter on the camera using black and white film.
highcontrastbwcolorcube

This is an inverted B&W filter which recreates the “hot black” infra-red view of a scene.
hotblackcolorcube

Changes the whole scene to shades of blue, as in a cyanotype photograph.
justblueitcolorcube

Changes things to a low-contrast green filter that approximates the view through night vision goggles.
nightvisioncolorcube

The only limit for creating your effect is what you can imagine and accomplish without any pixel rearrangement.

Apply the effect

The final step to applying the effect is to use the PNG you have created to an image in your app. I’ve created a class which converts the PNG files to NSData / Data for the Color Cube filter:

https://gist.github.com/JoshuaSullivan/b575d96bfd8a4177d8d46352e5f36458

The usage is simple; at runtime, simply pass the static method your effect PNG as a UIImage and the color cube size that you’re using. The class will validate the image size and then attempt to convert the 8-bit per-channel PNG data into the 32-bit per-channel format that is required by Core Image.

[gist https://gist.github.com/JoshuaSullivan/b575d96bfd8a4177d8d46352e5f36458 file=”in_use.swift”]

Once the filter has been created, you can use it with whatever input image you want, including video input. Color Cube is a very performant filter, so it is a fantastic way to include color transformations into a filter stack.